If you want to write a blog then you need a way of building pages, rendering content, and publishing everything to the web. There are a lot of different blogging platforms from fully hosted Software As A Service applications to incredibly simple shell scripts that take content and turn it in to HTML pages.
There are a couple of ways to do this. The old-school way is to load content in to a database and render each page when a user requests it. There are a stack of advantages to this method - it's easy to guard pages and only show them to certain users (think admin seeing previews of pages), it's straightforward to integrate dynamic page content, and it's much simpler to host because it's PHP and PHP's great at working everywhere.
The defacto blogging platform is Wordpress. In many respects Wordpress is awesome. It's simple to use, not too hard to set up, and it scales pretty well. A default Wordpress site isn't going to survive being hugged to death by HN or hitting the Producthunt front page, but with a little tweaking (read 'installing a plugin') it'll scale up to cope with just about anything.
The other way to do it is to bake the content in to static HTML and just host it like any other files. This, surprisingly, is actually the new way to do blogging. Generating a static website from a set of content files has a couple of advantages over the likes of Wordpress. First and foremost it's easy, at least in some respects. If you're not that bothered about fancy stuff then getting a Jekyll or a GatsbyJS website up and running takes seconds. Secondly it's cheap. blog.ooer.com is literally free to host, despite being secure, fast, and on it's own domain.
blog.ooer.com is generated by the GatsbyJS static site generator app, with a handful of plugins and custom code for creating pages. It has a serviceworker so it works when the user doesn't have a working internet connection, it uses SSL TLS security for user privacy so no one can snoop on what you're looking at, and (thanks to the amazing services provided by Github and Netlify) it doesn't cost anything to run.
Gatsby is a bit different to other static site generators I've used in the past. For a start it uses GraphQL to manage the data that the pages are built form. In the case of blog.ooer.com that's just a few Markdown files, but there's no reason why it has to be. There are connector plugins available to pull in content from an existing Wordpress site, a Medium account, even a Google Sheets spreadsheet. Each of these plugins works slightly differently, but the basic premise is that the connector takes unstructured data from a source and translates it in to a GraphQL source that page generators can query to get the necessary content for a page.
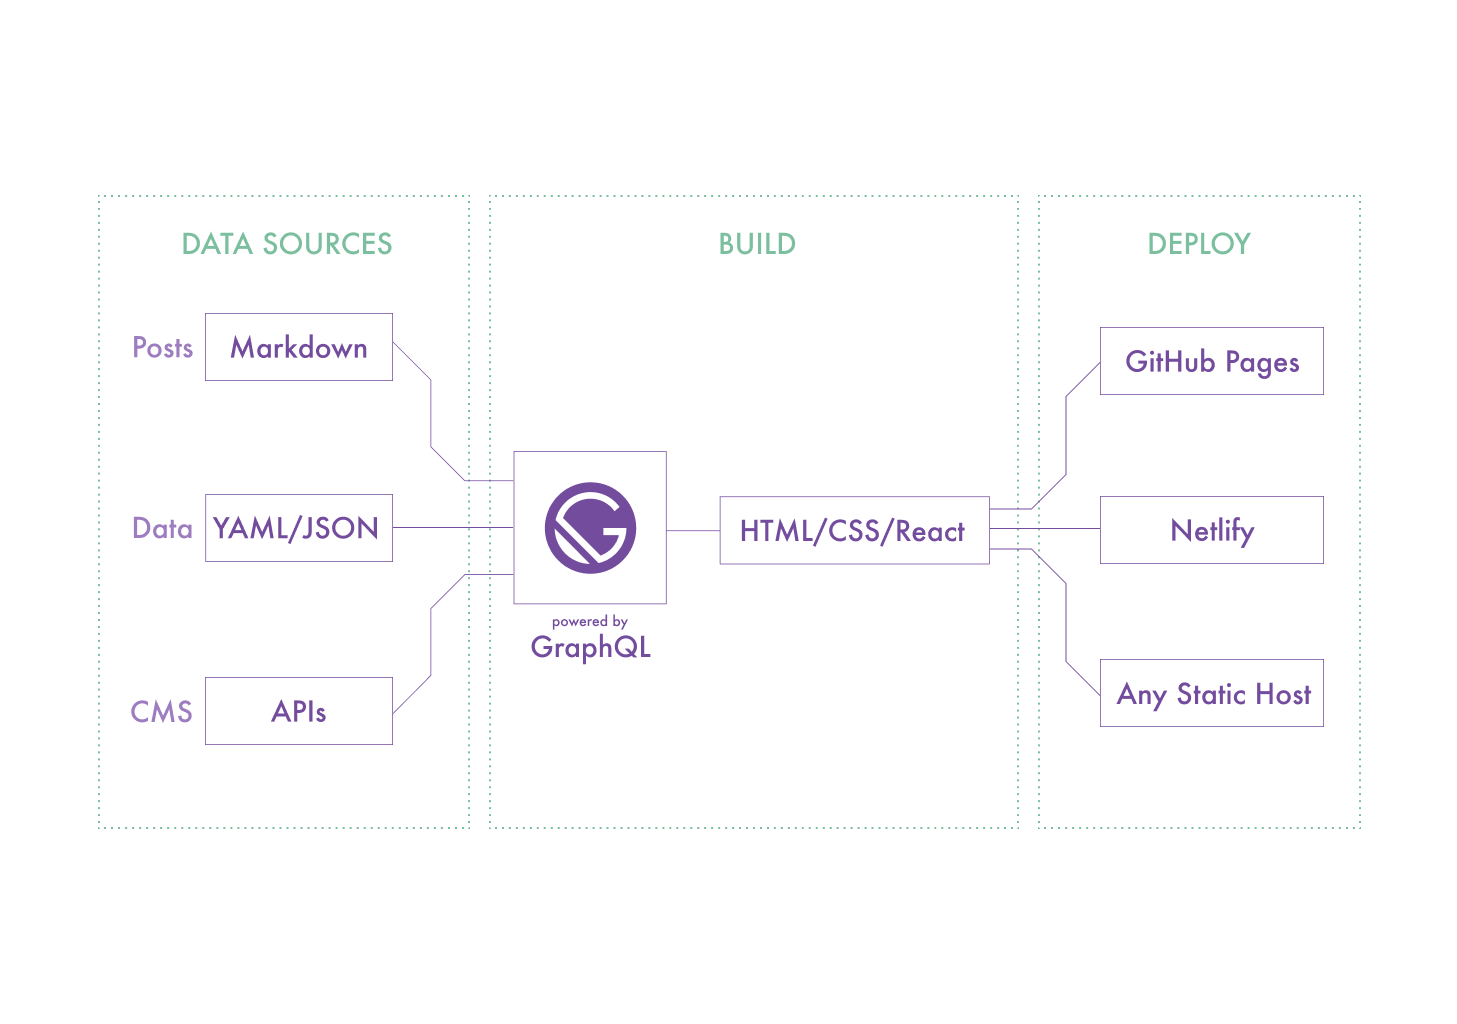
Once the data is available to a GraphQL query the actual page generation process in Gatsby is very similar to any other static site generator. A node.js (or browser script) loops through all the available data sources creating pages and saving them out to a build directory. As part of this process many things can happen; images can be loaded and optimised, metadata can be generated, templates can be populated. Any pages that are needed in the final website can be created. In the case of blog.ooer.com that means a page for each article as well as paginated lists for archive content and pages for each tag that's used on the articles.
GatsbyJS has an extensive API for hooking functions in to the build process to do whatever you might need. You can see how code is used by looking at the source for this site on its Github repo.
Installing Gatsby is really simple;
npm install -g gatsbyjsThen you can initialise a blog using the default starter using;
gatsbyjs new blog && cd blogThat's all that's necessary to get started. You can see your blog locally using;
gatsby developYou can also build a production version with;
gatsby buildWhile that's nice and all, and maybe good enough if you like a purple theme, you'll probably want to change a few things about the blog. To do this you'll need to create a new file in the root of the website directory called gatsby-config.json. The config file contains directives for GatsbyJS to use when it builds the static content.
The minimum config that a site will need is a title and a description for the meta data. Gatsby takes these values from the siteMetadata in the config object. Optionally there's also an author tag, which is handy for a blog, and the siteUrl value that's used for generating relative links.
module.exports = {
  siteMetadata: {
    title: `Ooer`,
    description: `Ooer description.`
    author: 'Chris Neale',
    siteUrl: `https://blog.ooer.com`,
  },
}
That's enough information to get the site running, but you can do much more with the config file. For example, if you want to add a plugin you can configure it in the plugins array.
If you want to be in more control of the meta data, title, language, etc of your website then React Helmet is a very useful plugin. It enables you to define practically every aspect of the site's <head> block. To install it just grab the gatsby plugin from NPM;
npm install --save gatsby-plugin-react-helmetOnce that's done you need to add it to the plugins array in the config file.
module.exports = {
  siteMetadata: {
    title: `Ooer`,
    description: `Ooer description.`
    author: 'Chris Neale',
    siteUrl: `https://blog.ooer.com`,
  },
  plugins: [
  	`gatsby-plugin-react-helmet`,
  ],
}
Now you can add a <helmet> component to any page that needs to change the header.
The next thing that we need to do in order to have an actual working blog website is to add some content. For that we need to add a data source plugin.
Part 2 Coming Soon